
Introduction
Setting up Git can be intimidating, especially for those that are trying a version control system for the first time or moving from Subversion. It use to be the case that Git was a huge hassle to install and use on Windows. However, today it's very easy to use Git on Windows either through Git Bash, if you are a fan of the command line, or if you prefer, a graphical interface, through programs such as TortoiseGit. But don't fret - we'll show you how to set everything up and connect it with Assembla.Table of Contents
- Download and Install Git for Windows
- Download and Install TortoiseGit (Optional but recommended for first timers)
- Generate SSH keys
- Link SSH key with Assembla
Prerequisites
- Assembla Git repository - sign up if you haven't already, Git and all our other project management tools are totally free for teams up to 3 people.
- A strong desire to install Git on Windows.
- That's it, let's go!
1. Download and Install Git for Windows
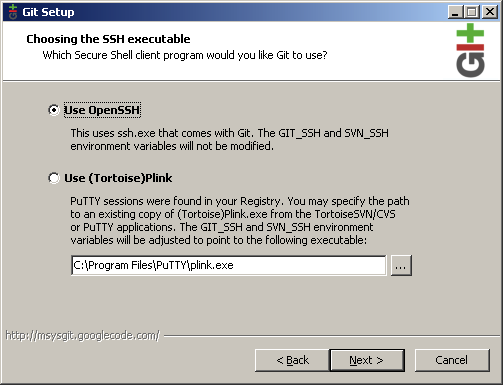
Getting started. You'll need to download and install Git for Windows. If you're unsure of which one to choose, just go with the full installer. After downloading, run the installer.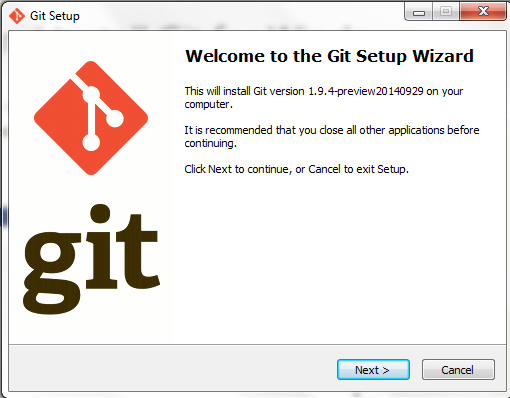 If you have PuTTY/TortoiseSVN installed, you may see this screen, otherwise just ignore this. Regardless, use OpenSSH to make things easy.
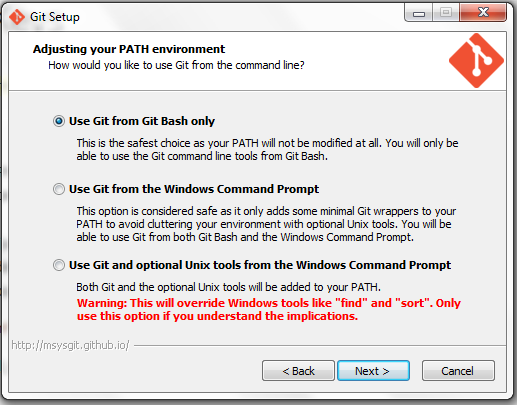
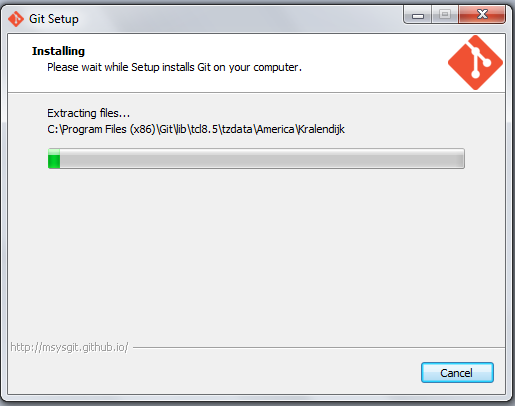
 From here, the process become quite streamlined. Simply follow the setup steps to ensure optimal settings. We recommend selecting "Use Git Bash only" as it provides an unmodified PATH.
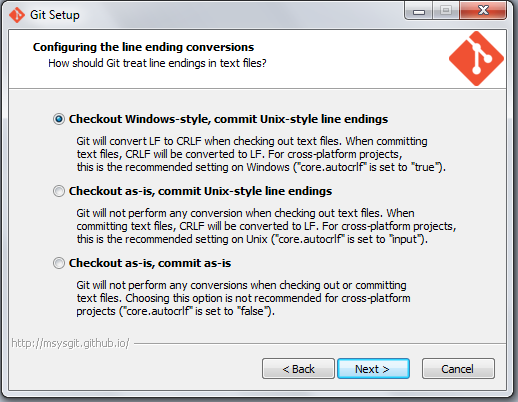
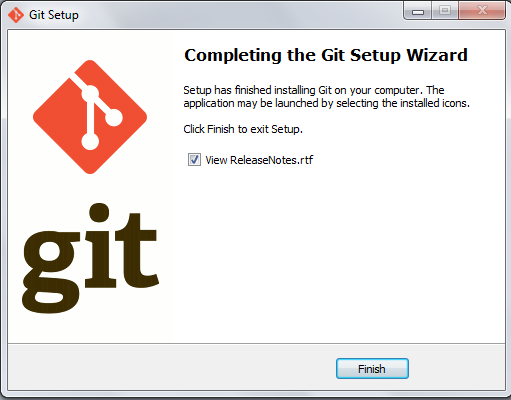
 After selecting next, we recommend chosing the option of "Checkout Windows-style, commit Unix-style line endings". Select next once you have done this.
Download and Install TortoiseGit
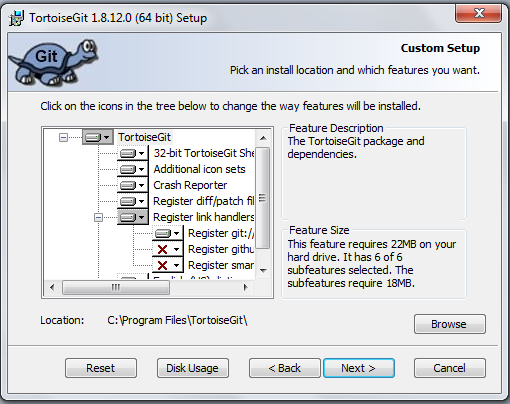
TortoiseGit is a Windows Shell Interface to Git and based on TortoiseSVN. This step is optional. If you are comfortable using the command line for interacting with Git, you don't need to install TortoiseGit. Next up, let's download and install TortoiseGit. Before you start the installation, please make sure that you choose the right installer for your PC, otherwise the setup will fail.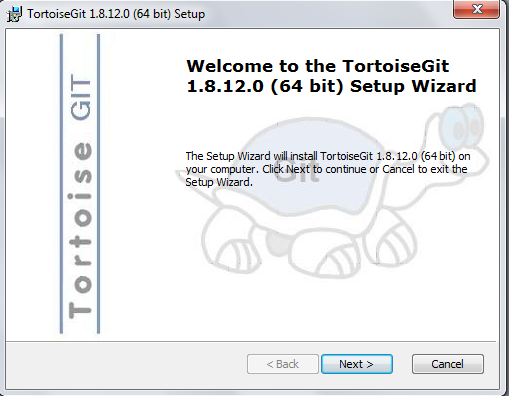
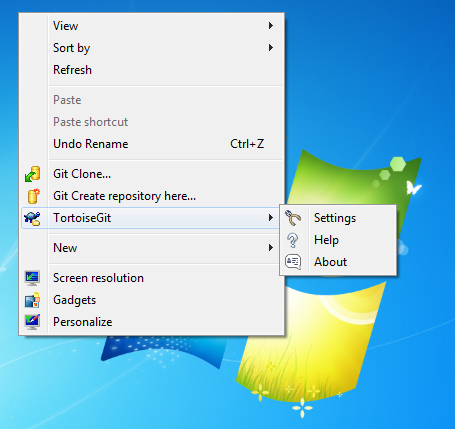
 We'll need to configure TortoiseGit - to do this, right click anywhere on your Desktop, select "TortoiseGit" and then "Settings."
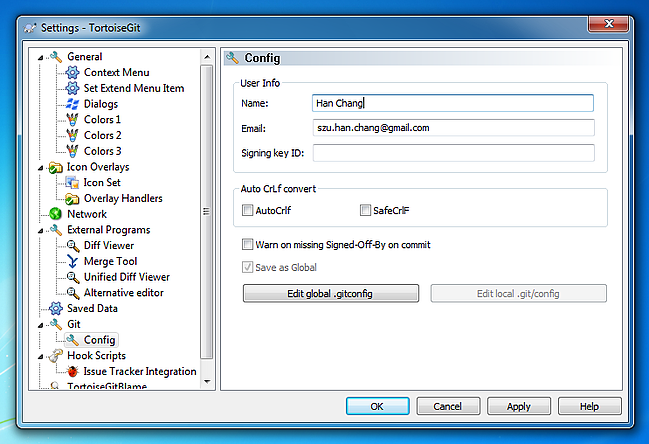
 Find "Git" and then click on "Config" from the menu on the left. Then fill in your Name and Email, making sure to use the same email that you used to sign up for Assembla.
Don't forget to click OK when you're done.
Find "Git" and then click on "Config" from the menu on the left. Then fill in your Name and Email, making sure to use the same email that you used to sign up for Assembla.
Don't forget to click OK when you're done.
 Great, now TortoiseGit is all set!
Generate Your SSH keys
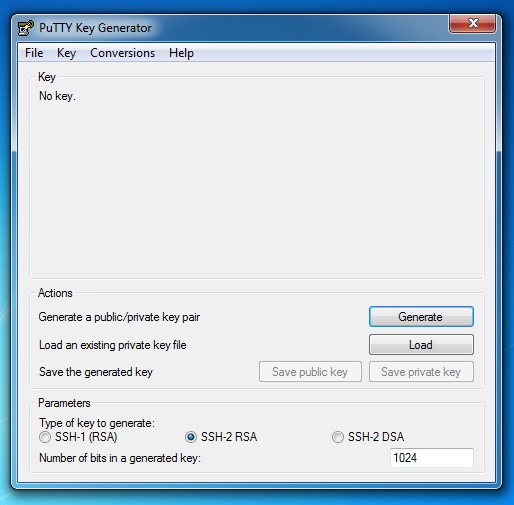
There's two ways to generate SSH keys: 1. If you installed TortoiseGit, use the method directly below. 2. If you only installed Git on Windows and are not using TortiseGit, jump to the "Git Bash SSH Keys" section. TortoiseGit SSH Keys SSH creates a secure connection from your computer to Assembla, making sure that you are who you claim to be so that only authorized persons can commit to your repository. Assembla needs to know your public SSH key to make the secure connection, so let's fire up Puttygen to generate an SSH key pair. Start -> Programs -> TortoiseGit -> Puttygen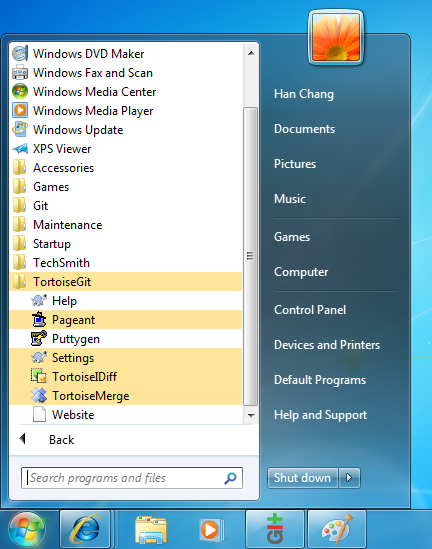 In Puttygen, first click on the "Generate" button.
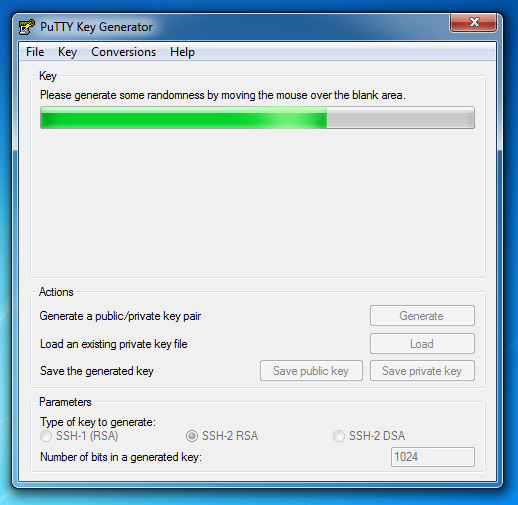
 Next up - you'll move your mouse around the big gray area under the progress bar to generate randomness for super security.
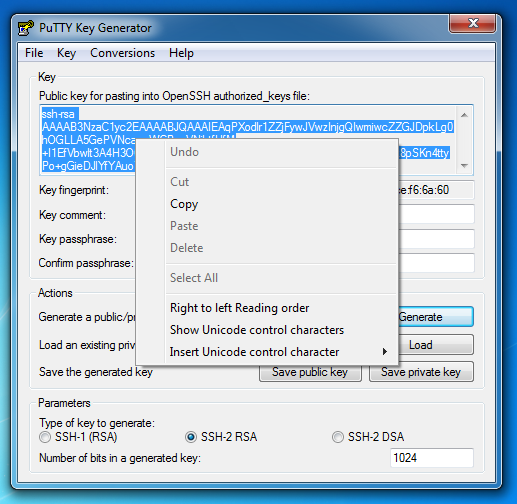
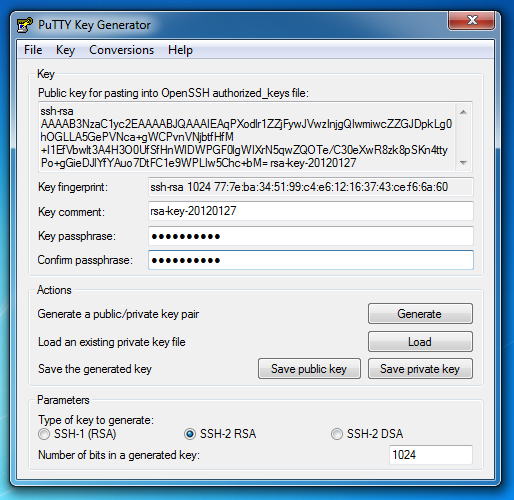
 Once the key is generated, you should copy it onto your clipboard. You will use this later to authenticate with Assembla.
 Afterwards, choose a memorable password and confirm it. Don't forget your password!
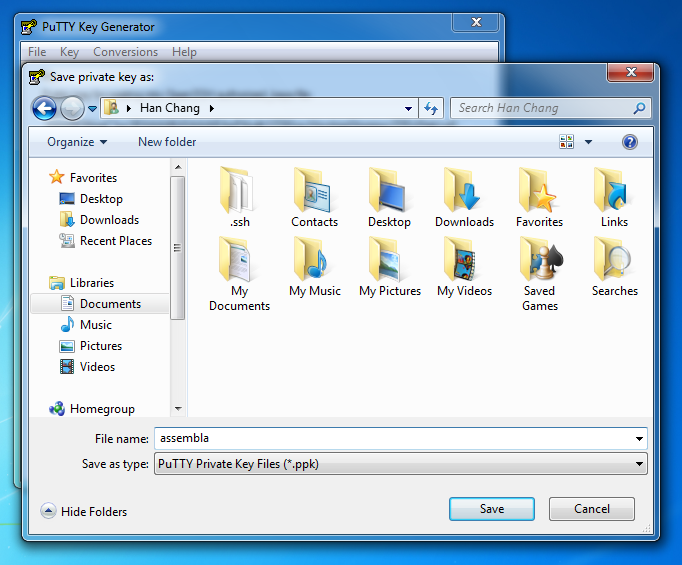
 Finally, click on the "Save private key" button and save your private key somewhere you'll remember.
Git Bash SSH Keys
If you did not install TortoiseGit, you're at the right place! If you did install TortoiseGit, follow the steps above and skip this section.- Start up Git Bash: Start -> All Programs -> Git -> Git Bash
- On the command prompt, type in the following command substituting with the email you used to sign up for Assembla.
- When it asks you for the file, just hit Enter.
- Please note that you should definitely enter a passphrase; when you type, nothing will show up. This is normal, don't worry about it.
Link Your SSH key with Assembla
Open up your Assembla profile which is where you'll paste the public key you just copied from the previous step.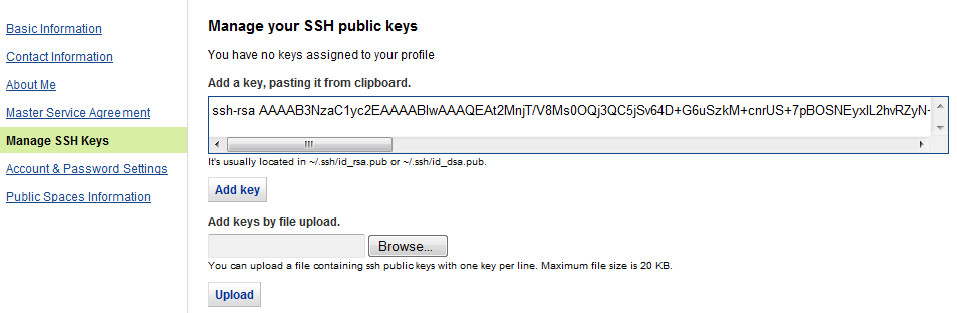 Click "Add Key" after you've pasted the key into the box. You should see something like the following picture below. If so, congratulations, you're done with this section!

Revisions
- September 29, 2015 @ 16:18:07 [Current Revision] by admin
- September 29, 2015 @ 16:18:07 by admin
- September 29, 2015 @ 16:18:00 by admin
Revision Differences
| September 29, 2015 @ 16:18:00 | Current Revision | ||
|---|---|---|---|
| Content | |||
| Unchanged: <h2>Introduction</h2> | Unchanged: <h2>Introduction</h2> | ||
| Unchanged: Setting up Git can be intimidating, especially for those that are trying a version control system for the first time or moving from Subversion. It use to be the case that Git was a huge hassle to install and use on Windows. However, today it's very easy to use Git on Windows either through Git Bash, if you are a fan of the command line, or if you prefer, a graphical interface, through programs such as TortoiseGit. But don't fret - we'll show you how to set everything up and connect it with Assembla. | Unchanged: Setting up Git can be intimidating, especially for those that are trying a version control system for the first time or moving from Subversion. It use to be the case that Git was a huge hassle to install and use on Windows. However, today it's very easy to use Git on Windows either through Git Bash, if you are a fan of the command line, or if you prefer, a graphical interface, through programs such as TortoiseGit. But don't fret - we'll show you how to set everything up and connect it with Assembla. | ||
| Unchanged: <h2>Table of Contents</h2> | Unchanged: <h2>Table of Contents</h2> | ||
| Unchanged: <ol> | Unchanged: <ol> | ||
| Unchanged: <li><a href="http:// msysgit.github.io/">Download and Install Git for Windows</a></li> | Unchanged: <li><a href="http:// msysgit.github.io/">Download and Install Git for Windows</a></li> | ||
| Unchanged: <li><a href="http:// blog.assembla.com/ AssemblaBlog/ tabid/12618/bid/ 77264/Setting- Up-Git-on-Windows-in-Four- Easy-Steps.aspx#tortoisegit">Download and Install TortoiseGit</a> (Optional but recommended for first timers)</li> | Unchanged: <li><a href="http:// blog.assembla.com/ AssemblaBlog/ tabid/12618/bid/ 77264/Setting- Up-Git-on-Windows-in-Four- Easy-Steps.aspx#tortoisegit">Download and Install TortoiseGit</a> (Optional but recommended for first timers)</li> | ||
| Unchanged: <li><a href="http:// blog.assembla.com/ AssemblaBlog/ tabid/12618/bid/ 77264/Setting- Up-Git-on-Windows-in-Four- Easy-Steps.aspx#generatessh">Generate SSH keys</a></li> | Unchanged: <li><a href="http:// blog.assembla.com/ AssemblaBlog/ tabid/12618/bid/ 77264/Setting- Up-Git-on-Windows-in-Four- Easy-Steps.aspx#generatessh">Generate SSH keys</a></li> | ||
| Unchanged: <li><a href="http:// blog.assembla.com/ AssemblaBlog/ tabid/12618/bid/ 77264/Setting- Up-Git-on-Windows-in-Four- Easy-Steps.aspx#linkssh">Link SSH key with Assembla</a></li> | Unchanged: <li><a href="http:// blog.assembla.com/ AssemblaBlog/ tabid/12618/bid/ 77264/Setting- Up-Git-on-Windows-in-Four- Easy-Steps.aspx#linkssh">Link SSH key with Assembla</a></li> | ||
| Unchanged: </ol> | Unchanged: </ol> | ||
| Unchanged: <h2>Prerequisites</h2> | Unchanged: <h2>Prerequisites</h2> | ||
| Unchanged: <ol> | Unchanged: <ol> | ||
| Unchanged: <li><a title="Assembla Git repository" href="https:/ /www.assembla.com/ plans?ref=sugow" target="_blank">Assembla Git repository</a> - sign up if you haven't already, Git and all our other project management tools are totally free for teams up to 3 people.</li> | Unchanged: <li><a title="Assembla Git repository" href="https:/ /www.assembla.com/ plans?ref=sugow" target="_blank">Assembla Git repository</a> - sign up if you haven't already, Git and all our other project management tools are totally free for teams up to 3 people.</li> | ||
| Unchanged: <li>A strong desire to install Git on Windows.</li> | Unchanged: <li>A strong desire to install Git on Windows.</li> | ||
| Unchanged: <li>That's it, let's go!</li> | Unchanged: <li>That's it, let's go!</li> | ||
| Unchanged: </ol> | Unchanged: </ol> | ||
| Unchanged: <h3>1. Download and Install Git for Windows</h3> | Unchanged: <h3>1. Download and Install Git for Windows</h3> | ||
| Unchanged: Getting started. You'll need to download and install <a title="Git for Windows" href="http:// msysgit.github.io/" target="_blank">Git for Windows</a>. If you're unsure of which one to choose, just go with the full installer. After downloading, run the installer. | Unchanged: Getting started. You'll need to download and install <a title="Git for Windows" href="http:// msysgit.github.io/" target="_blank">Git for Windows</a>. If you're unsure of which one to choose, just go with the full installer. After downloading, run the installer. | ||
| Unchanged: <img src="http://cdn2.hubspot.net/ hub/365/file- 2182891767-png/ Blog/Git_on_windows_blog/ welcome_Git-setup.png?t= 1441984661368" alt="welcome_Git-setup" /> | Unchanged: <img src="http://cdn2.hubspot.net/ hub/365/file- 2182891767-png/ Blog/Git_on_windows_blog/ welcome_Git-setup.png?t= 1441984661368" alt="welcome_Git-setup" /> | ||
| Unchanged: If you have PuTTY/TortoiseSVN installed, you may see this screen, otherwise just ignore this. Regardless, use OpenSSH to make things easy. | Unchanged: If you have PuTTY/TortoiseSVN installed, you may see this screen, otherwise just ignore this. Regardless, use OpenSSH to make things easy. | ||
| Unchanged: <img id="img-1328138612931" class="alignCenter" src="http://cdn2.hubspot.net/ hub/365/file- 13163644-png/ images/ssh-executable.png?t= 1441984661368" alt="SSH Executable" border="0" /> | Unchanged: <img id="img-1328138612931" class="alignCenter" src="http://cdn2.hubspot.net/ hub/365/file- 13163644-png/ images/ssh-executable.png?t= 1441984661368" alt="SSH Executable" border="0" /> | ||
| Unchanged: From here, the process become quite streamlined. Simply follow the setup steps to ensure optimal settings. We recommend selecting "Use Git Bash only" as it provides an unmodified PATH. | Unchanged: From here, the process become quite streamlined. Simply follow the setup steps to ensure optimal settings. We recommend selecting "Use Git Bash only" as it provides an unmodified PATH. | ||
| Unchanged: <img src="http://cdn2.hubspot.net/ hub/365/file- 2182891772-png/ Blog/Git_on_windows_blog/ Git_adjustPath.png?t= 1441984661368" alt="Git_adjustPath" /> | Unchanged: <img src="http://cdn2.hubspot.net/ hub/365/file- 2182891772-png/ Blog/Git_on_windows_blog/ Git_adjustPath.png?t= 1441984661368" alt="Git_adjustPath" /> | ||
| Unchanged: After selecting next, we recommend chosing the option of "Checkout Windows-style, commit Unix-style line endings". Select next once you have done this. | Unchanged: After selecting next, we recommend chosing the option of "Checkout Windows-style, commit Unix-style line endings". Select next once you have done this. | ||
| Unchanged: <img src="http://cdn2.hubspot.net/ hub/365/file- 2181997909-png/ Blog/Git_on_windows_blog/ Git_Configure_ LineEndings.png?t= 1441984661368" alt="Git_Configure_ LineEndings" /> | Unchanged: <img src="http://cdn2.hubspot.net/ hub/365/file- 2181997909-png/ Blog/Git_on_windows_blog/ Git_Configure_ LineEndings.png?t= 1441984661368" alt="Git_Configure_ LineEndings" /> | ||
| Unchanged: <img src="http://cdn2.hubspot.net/ hub/365/file- 2181997914-png/ Blog/Git_on_windows_blog/ Git_Installation_ InProgress.png?t= 1441984661368" alt="Git_Installation_InProgress" /> | Unchanged: <img src="http://cdn2.hubspot.net/ hub/365/file- 2181997914-png/ Blog/Git_on_windows_blog/ Git_Installation_ InProgress.png?t= 1441984661368" alt="Git_Installation_InProgress" /> | ||
| Unchanged: <img src="http://cdn2.hubspot.net/ hub/365/file- 2182891762-png/ Blog/Git_on_windows_blog/ Git_Installation_ complete.png?t= 1441984661368" alt="Git_Installation_complete" /> | Unchanged: <img src="http://cdn2.hubspot.net/ hub/365/file- 2182891762-png/ Blog/Git_on_windows_blog/ Git_Installation_ complete.png?t= 1441984661368" alt="Git_Installation_complete" /> | ||
| Unchanged: | Unchanged: | ||
| Unchanged: <h3 id="tortoisegit">Download and Install TortoiseGit</h3> | Unchanged: <h3 id="tortoisegit">Download and Install TortoiseGit</h3> | ||
| Unchanged: <em>TortoiseGit is a Windows Shell Interface to Git and based on TortoiseSVN. | Unchanged: <em>TortoiseGit is a Windows Shell Interface to Git and based on TortoiseSVN. | ||
| Deleted: This step is optional. If you are comfortable using the command line for interacting with Git, you don't need to install TortoiseGit. | Added: This step is optional. If you are comfortable using the command line for interacting with Git, you don't need to install TortoiseGit.</em> | ||
| Deleted: Next up, let's download and install<a href="https:/ /code.google.com/ p/tortoisegit/ wiki/Download"> TortoiseGit.</a | Added: Next up, let's download and install<a href="https:/ /code.google.com/ p/tortoisegit/ wiki/Download"> TortoiseGit.</a> | ||
| Unchanged: <em>Before you start the installation, please make sure that you choose the right installer for your PC, otherwise the setup will fail.</em> | Unchanged: <em>Before you start the installation, please make sure that you choose the right installer for your PC, otherwise the setup will fail.</em> | ||
| Unchanged: | Unchanged: | ||
| Unchanged: <img src="http://cdn2.hubspot.net/ hub/365/file- 2235583470-png/ Blog/Git_on_windows_blog/ Tortoise_Git_ 3.png?t=1441984661368" alt="Tortoise_Git_3" /> | Unchanged: <img src="http://cdn2.hubspot.net/ hub/365/file- 2235583470-png/ Blog/Git_on_windows_blog/ Tortoise_Git_ 3.png?t=1441984661368" alt="Tortoise_Git_3" /> | ||
| Unchanged: | Unchanged: | ||
| Unchanged: <img src="http://cdn2.hubspot.net/ hub/365/file- 2236331962-png/ Blog/Git_on_windows_blog/ Tortoise_Git_ 4.png?t=1441984661368" alt="Tortoise_Git_4" /> | Unchanged: <img src="http://cdn2.hubspot.net/ hub/365/file- 2236331962-png/ Blog/Git_on_windows_blog/ Tortoise_Git_ 4.png?t=1441984661368" alt="Tortoise_Git_4" /> | ||
| Unchanged: | Unchanged: | ||
| Unchanged: <img src="http://cdn2.hubspot.net/ hub/365/file- 2236347387-png/ Blog/Git_on_windows_blog/ Tortoise_Git_ 5.png?t=1441984661368" alt="Tortoise_Git_5" /> | Unchanged: <img src="http://cdn2.hubspot.net/ hub/365/file- 2236347387-png/ Blog/Git_on_windows_blog/ Tortoise_Git_ 5.png?t=1441984661368" alt="Tortoise_Git_5" /> | ||
| Unchanged: | Unchanged: | ||
| Unchanged: <img src="http://cdn2.hubspot.net/ hub/365/file- 2235566969-png/ Blog/Git_on_windows_blog/ Tortoise_Git_ 7.png?t=1441984661368" alt="Tortoise_Git_7" /> | Unchanged: <img src="http://cdn2.hubspot.net/ hub/365/file- 2235566969-png/ Blog/Git_on_windows_blog/ Tortoise_Git_ 7.png?t=1441984661368" alt="Tortoise_Git_7" /> | ||
| Unchanged: We'll need to configure TortoiseGit - to do this, right click anywhere on your Desktop, select "TortoiseGit" and then "Settings." | Unchanged: We'll need to configure TortoiseGit - to do this, right click anywhere on your Desktop, select "TortoiseGit" and then "Settings." | ||
| Unchanged: <img id="img-1328138709356" src="http://cdn2.hubspot.net/ hub/365/file- 13164131-png/ images/tortoise8.png?t= 1441984661368" alt="tortoise8" border="0" /> | Unchanged: <img id="img-1328138709356" src="http://cdn2.hubspot.net/ hub/365/file- 13164131-png/ images/tortoise8.png?t= 1441984661368" alt="tortoise8" border="0" /> | ||
| Unchanged: Find "Git" and then click on "Config" from the menu on the left. Then fill in your Name and Email, making sure to use the same email that you used to sign up for Assembla. | Unchanged: Find "Git" and then click on "Config" from the menu on the left. Then fill in your Name and Email, making sure to use the same email that you used to sign up for Assembla. | ||
| Unchanged: Don't forget to click OK when you're done. | Unchanged: Don't forget to click OK when you're done. | ||
| Unchanged: <img id="img-1328111072884" src="http://cdn2.hubspot.net/ hub/365/file- 13164138-png/ images/tortoise9.png?t= 1441984661368& width=650&height=444" alt="tortoise9" width="650" height="444" border="0" /> | Unchanged: <img id="img-1328111072884" src="http://cdn2.hubspot.net/ hub/365/file- 13164138-png/ images/tortoise9.png?t= 1441984661368& width=650&height=444" alt="tortoise9" width="650" height="444" border="0" /> | ||
| Unchanged: Great, now TortoiseGit is all set! | Unchanged: Great, now TortoiseGit is all set! | ||
| Unchanged: <h3 id="generatessh">Generate Your SSH keys</h3> | Unchanged: <h3 id="generatessh">Generate Your SSH keys</h3> | ||
| Unchanged: There's two ways to generate SSH keys: | Unchanged: There's two ways to generate SSH keys: | ||
| Unchanged: 1. If you installed TortoiseGit, use the method directly below. 2. If you only installed Git on Windows and are not using TortiseGit, jump to the "Git Bash SSH Keys" section. | Unchanged: 1. If you installed TortoiseGit, use the method directly below. 2. If you only installed Git on Windows and are not using TortiseGit, jump to the "Git Bash SSH Keys" section. | ||
| Unchanged: <strong>TortoiseGit SSH Keys</strong> | Unchanged: <strong>TortoiseGit SSH Keys</strong> | ||
| Unchanged: SSH creates a secure connection from your computer to Assembla, making sure that you are who you claim to be so that only authorized persons can commit to your repository. Assembla needs to know your public SSH key to make the secure connection, so let's fire up Puttygen to generate an SSH key pair. | Unchanged: SSH creates a secure connection from your computer to Assembla, making sure that you are who you claim to be so that only authorized persons can commit to your repository. Assembla needs to know your public SSH key to make the secure connection, so let's fire up Puttygen to generate an SSH key pair. | ||
| Unchanged: Start -> Programs -> TortoiseGit -> Puttygen | Unchanged: Start -> Programs -> TortoiseGit -> Puttygen | ||
| Unchanged: <img id="img-1328138764470" src="http://cdn2.hubspot.net/ hub/365/file- 13163333-png/ images/puttygen1.png?t= 1441984661368" alt="puttygen1" border="0" /> | Unchanged: <img id="img-1328138764470" src="http://cdn2.hubspot.net/ hub/365/file- 13163333-png/ images/puttygen1.png?t= 1441984661368" alt="puttygen1" border="0" /> | ||
| Unchanged: In Puttygen, first click on the "Generate" button. | Unchanged: In Puttygen, first click on the "Generate" button. | ||
| Unchanged: <img id="img-1328138803440" src="http://cdn2.hubspot.net/ hub/365/file- 13163340-png/ images/puttygen2.png?t= 1441984661368" alt="puttygen2" border="0" /> | Unchanged: <img id="img-1328138803440" src="http://cdn2.hubspot.net/ hub/365/file- 13163340-png/ images/puttygen2.png?t= 1441984661368" alt="puttygen2" border="0" /> | ||
| Unchanged: Next up - you'll move your mouse around the big gray area under the progress bar to generate randomness for super security. | Unchanged: Next up - you'll move your mouse around the big gray area under the progress bar to generate randomness for super security. | ||
| Unchanged: <img id="img-1328138822744" src="http://cdn2.hubspot.net/ hub/365/file- 13163346-png/ images/puttygen3.png?t= 1441984661368" alt="puttygen3" border="0" /> | Unchanged: <img id="img-1328138822744" src="http://cdn2.hubspot.net/ hub/365/file- 13163346-png/ images/puttygen3.png?t= 1441984661368" alt="puttygen3" border="0" /> | ||
| Unchanged: Once the key is generated, you should copy it onto your clipboard. You will use this later to authenticate with Assembla. | Unchanged: Once the key is generated, you should copy it onto your clipboard. You will use this later to authenticate with Assembla. | ||
| Unchanged: <img id="img-1328138838146" src="http://cdn2.hubspot.net/ hub/365/file- 13163353-png/ images/puttygen4.png?t= 1441984661368" alt="puttygen4" border="0" /> | Unchanged: <img id="img-1328138838146" src="http://cdn2.hubspot.net/ hub/365/file- 13163353-png/ images/puttygen4.png?t= 1441984661368" alt="puttygen4" border="0" /> | ||
| Unchanged: Afterwards, choose a memorable password and confirm it. Don't forget your password! | Unchanged: Afterwards, choose a memorable password and confirm it. Don't forget your password! | ||
| Unchanged: <img id="img-1328138861839" src="http://cdn2.hubspot.net/ hub/365/file- 13163356-png/ images/puttygen5.png?t= 1441984661368" alt="puttygen5" border="0" /> | Unchanged: <img id="img-1328138861839" src="http://cdn2.hubspot.net/ hub/365/file- 13163356-png/ images/puttygen5.png?t= 1441984661368" alt="puttygen5" border="0" /> | ||
| Unchanged: Finally, click on the "Save private key" button and save your private key somewhere you'll remember. | Unchanged: Finally, click on the "Save private key" button and save your private key somewhere you'll remember. | ||
| Unchanged: <img id="img-1328111087241" src="http://cdn2.hubspot.net/ hub/365/file- 13163364-png/ images/puttygen6.png?t= 1441984661368& width=650&height=538" alt="puttygen6" width="650" height="538" border="0" /> | Unchanged: <img id="img-1328111087241" src="http://cdn2.hubspot.net/ hub/365/file- 13163364-png/ images/puttygen6.png?t= 1441984661368& width=650&height=538" alt="puttygen6" width="650" height="538" border="0" /> | ||
| Deleted: <h3> | |||
| Deleted: Git Bash SSH Keys</h3> | Added: <h3>Git Bash SSH Keys</h3> | ||
| Deleted: <em>If you did not install TortoiseGit, you're at the right place! If you did install TortoiseGit, follow the steps above and skip this section. | Added: <em>If you did not install TortoiseGit, you're at the right place! If you did install TortoiseGit, follow the steps above and skip this section.</em> | ||
| Deleted: </em> | |||
| Added: | |||
| Unchanged: <ul> | Unchanged: <ul> | ||
| Unchanged: <li>Start up Git Bash: Start -> All Programs -> Git -> Git Bash</li> | Unchanged: <li>Start up Git Bash: Start -> All Programs -> Git -> Git Bash</li> | ||
| Unchanged: <li>On the command prompt, type in the following command substituting with the email you used to sign up for Assembla.</li> | Unchanged: <li>On the command prompt, type in the following command substituting with the email you used to sign up for Assembla.</li> | ||
| Unchanged: <li>When it asks you for the file, just hit Enter.</li> | Unchanged: <li>When it asks you for the file, just hit Enter.</li> | ||
| Unchanged: <li>Please note that you should definitely enter a passphrase; when you type, nothing will show up. This is normal, don't worry about it.</li> | Unchanged: <li>Please note that you should definitely enter a passphrase; when you type, nothing will show up. This is normal, don't worry about it.</li> | ||
| Unchanged: </ul> | Unchanged: </ul> | ||
| Unchanged: ssh-keygen -t rsa -C "[email protected]" | Unchanged: ssh-keygen -t rsa -C "[email protected]" | ||
| Unchanged: Use Notepad to open up the .ssh/id_rsa.pub file you just generated and copy the all of the contents of that file. | Unchanged: Use Notepad to open up the .ssh/id_rsa.pub file you just generated and copy the all of the contents of that file. | ||
| Unchanged: <h3 id="linkssh">Link Your SSH key with Assembla</h3> | Unchanged: <h3 id="linkssh">Link Your SSH key with Assembla</h3> | ||
| Unchanged: <a title="Open up your Assembla profile" href="https:/ /www.assembla.com/user/edit/ edit_git_settings" target="_blank" rel="nofollow">Open up your Assembla profile</a> which is where you'll paste the public key you just copied from the previous step. | Unchanged: <a title="Open up your Assembla profile" href="https:/ /www.assembla.com/user/edit/ edit_git_settings" target="_blank" rel="nofollow">Open up your Assembla profile</a> which is where you'll paste the public key you just copied from the previous step. | ||
| Unchanged: <div><img id="img-1328138912272" src="http://cdn2.hubspot.net/ hub/365/file- 13162940-png/ images/key1.png?t= 1441984661368& width=650&height=211" alt="key1" width="650" height="211" border="0" /> | Unchanged: <div><img id="img-1328138912272" src="http://cdn2.hubspot.net/ hub/365/file- 13162940-png/ images/key1.png?t= 1441984661368& width=650&height=211" alt="key1" width="650" height="211" border="0" /> | ||
| Unchanged: Click "Add Key" after you've pasted the key into the box. You should see something like the following picture below. If so, congratulations, you're done with this section! | Unchanged: Click "Add Key" after you've pasted the key into the box. You should see something like the following picture below. If so, congratulations, you're done with this section! | ||
| Unchanged: <img id="img-1328138952874" class="alignCenter" src="http://cdn2.hubspot.net/ hub/365/file- 13162945-png/ images/key2.png?t= 1441984661368& width=650&height=113" alt="key2" width="650" height="113" border="0" /></div> | Unchanged: <img id="img-1328138952874" class="alignCenter" src="http://cdn2.hubspot.net/ hub/365/file- 13162945-png/ images/key2.png?t= 1441984661368& width=650&height=113" alt="key2" width="650" height="113" border="0" /></div> | ||
| Unchanged: - See more at: http://blog.assembla.com/ AssemblaBlog/ tabid/12618/ bid/77264/Setting-Up-Git- on-Windows-in- Four-Easy-Steps.aspx#sthash.uMKHhVUp.dpuf | Unchanged: - See more at: http://blog.assembla.com/ AssemblaBlog/ tabid/12618/ bid/77264/Setting-Up-Git- on-Windows-in- Four-Easy-Steps.aspx#sthash.uMKHhVUp.dpuf | ||
Note: Spaces may be added to comparison text to allow better line wrapping.
*Aw, this was a really nice post. In idea I would like to put in writing like this additionally ? taking time and actual effort to make a very good article? but what can I say? I procrastinate alot and by no means seem to get something done.